

Waldorf Window Star Tutorial
- Rowan Webley
- Dec 9, 2020
- 3 min read

This week we have been decorating our windows for winter, with white paper snowflakes and Waldorf window stars. Window stars are quite simple to make. Here are two tutorials for making two types of Waldorf window stars, suitable for beginners.
You will need:
Kite paper
A glue stick
If you are local to Bristol then you can buy kite paper at Playful Toyshop on Gloucester Road. For online deliveries, you can order from Myriad Natural Toys, or from Amazon (affiliate link).
A Simple Star: Beginner

You will need two sheets of kite paper (We use ready prepared squares, 15 cm x 15 cm).
Step 1: Fold the kite paper in half, then cut along the fold. Fold each half of the kite paper in half again, then cut along the folds. Repeat with your second sheet of kite paper. You will end up with 8 squares of kite paper.


Step 2: Fold each square in half along a diagonal line, so that when you open the paper it reveals two triangles. Fold both corners of the paper in to meet the centre fold. Repeat this process with all eight squares of kite paper.


Step 3: Now you are ready to secure the pieces of kite paper together to form a star. Place a small dot of glue in the bottom right triangle. Lay your second piece of kite paper on top, as shown in the photograph. Repeat the process with all eight pieces, tucking the very last piece under the first and securing with glue.


Turn your finished window star over. It is now ready to be displayed on your window. We attach ours with a small dot of glue at the tips. The window stars can be gently removed at the end of the season, and the glue washes off easily.

To make a miniature version, cut your kite paper into 16 squares during step 1. You will be able to make two miniature stars out of each sheet of kite paper.
A Slightly Fancier Star: Advanced Beginner (!)

You will need one sheet of kite paper (We use ready prepared squares, 15 cm x 15 cm).
Step 1: Fold the kite paper in half, then cut along the fold. Fold each half of the kite paper in half again, then cut along the folds. Fold each square of kite paper in half again, lengthways, then cut along the folds. You will end up with 8 rectangle of kite paper.


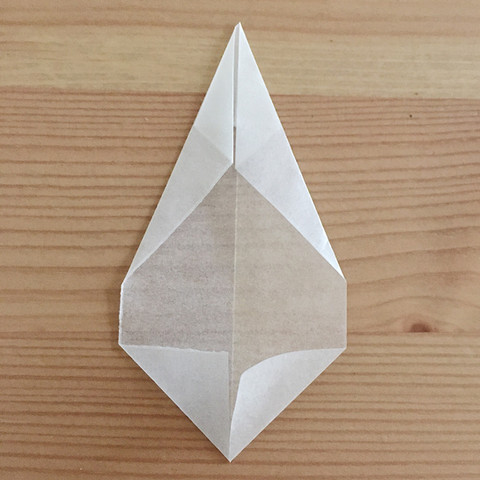
Step 2: Fold each square in half lengthways, so that when you open the paper it reveals two rectangles. Fold both top corners of the paper in to meet the centre fold, then fold both bottom corners in to meet the centre fold. Repeat this process with all eight pieces of kite paper.


Step 3: Fold the top corners in again to meet the centre fold. Repeat this process with all eight pieces of kite paper.


Step 3: Now you are ready to secure the pieces of kite paper together to form a star. Place a small dot of glue in the bottom right triangle. Lay your second piece of kite paper on top, as shown in the photograph. Repeat the process with all eight pieces, tucking the very last piece under the first and securing with glue.


Turn your finished window star over. It is now ready to be displayed on your window.

We've been experimenting with layering different styles and sizes, which looks very effective. Simply secure the two stars together with a little glue, then stick to your window.

A winter window wanderland, for all to enjoy!


Comments